|-转 手把手从0开始教你搭建Jumpserver,为服务器安全保驾护航!
1、Jumpserver简单介绍
Jumpserver 是全球首款完全开源的堡垒机,使用 GNU GPL v2.0 开源协议,是符合 4A 的专业运维审计系统。Jumpserver 使用 Python / Django 进行开发,遵循 Web 2.0 规范,配备了业界领先的 Web Terminal 解决方案,交互界面美观、用户体验好。
Jumpserver 采纳分布式架构,支持多机房跨区域部署,中心节点提供 API,各机房部署登录节点,可横向扩展、无并发访问限制。
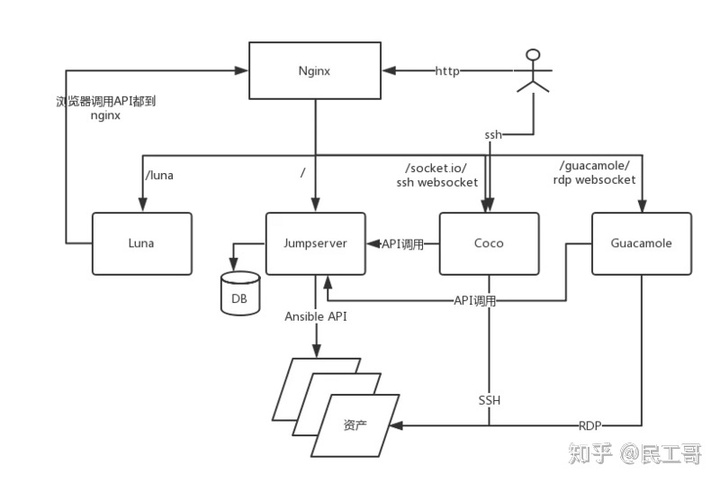
2、架构图如下

3、组件说明
- Jumpserver
现指 Jumpserver 管理后台,是核心组件(Core), 使用 Django Class Based View 风格开发,支持 Restful API。 - Coco
实现了 SSH Server 和 Web Terminal Server 的组件,提供 SSH 和 WebSocket 接口, 使用 Paramiko 和 Flask 开发。 - Luna
现在是 Web Terminal 前端,计划前端页面都由该项目提供,Jumpserver 只提供 API,不再负责后台渲染html等。 - Guacamole
Apache 跳板机项目,Jumpserver 使用其组件实现 RDP 功能,Jumpserver 并没有修改其代码而是添加了额外的插件,支持 Jumpserver 调用。 - Jumpserver-Python-SDK
Jumpserver API Python SDK,Coco 目前使用该 SDK 与 Jumpserver API 交互。
参考文章:http://docs.jumpserver.org/zh..._instruction.html
4、安装环境准备
系统环境说明
[root@test ~]# cat /etc/redhat-release
CentOS Linux release 7.4.1708 (Core)
[root@test ~]# uname -r
3.10.0-693.el7.x86_64
[root@test ~]# ip add|grep 192.168.22
inet 192.168.22.175/24 brd 192.168.22.255 scope global ens32
关闭防火墙与selinux
[root@test ~]# systemctl stop firewalld
[root@test ~]# systemctl disable firewalld
[root@test ~]# sed -i "s#SELINUX=enforcing#SELINUX=disabled#g" /etc/selinux/config
[root@master ~]# grep "SELINUX=" /etc/selinux/config
# SELINUX= can take one of these three values:
SELINUX=disabled
[root@test ~]# reboot
准备 Python3 和 Python 虚拟环境
安装依赖包
[root@test ~]# yum -y install wget sqlite-devel xz gcc automake zlib-devel openssl-devel epel-release git
编译安装python
[root@test ~]# wget https://www.python.org/ftp/python/3.6.1/Python-3.6.1.tar.xz
[root@test ~]# tar xf Python-3.6.1.tar.xz
[root@test ~]# cd Python-3.6.1
[root@test Python-3.6.1]# ./configure
[root@test Python-3.6.1]# echo $?
0
[root@test Python-3.6.1]# make && make install
-------------------过程部分省略
fi
Collecting setuptools
Collecting pip
Installing collected packages: setuptools, pip
Successfully installed pip-9.0.1 setuptools-28.8.0
[root@test Python-3.6.1]# echo $?
0
建立 Python 虚拟环境
因为 CentOS 6/7 自带的是 Python2,而 Yum 等工具依赖原来的 Python,为了不扰乱原来的环境我们来使用 Python 虚拟环境
[root@test Python-3.6.1]# cd /opt/
[root@test opt]# python3 -m  venv py3
[root@test opt]# source /opt/py3/bin/activate(py3) [root@test opt]#
# 看到上面的提示符代表成功,以后运行 Jumpserver 都要先运行以上 source 命令,以下所有命令均在该虚拟环境中运行(py3)
[root@localhost py3]
5、安装jumpserver
(py3) [root@test opt]# pwd
/opt
(py3) [root@test opt]# git clone --depth=1 https://github.com/jumpserver/jumpserver.git
Cloning into 'jumpserver'...
remote: Counting objects: 718, done.
remote: Compressing objects: 100% (652/652), done.
remote: Total 718 (delta 95), reused 380 (delta 22), pack-reused 0
Receiving objects: 100% (718/718), 5.31 MiB | 440.00 KiB/s, done.
Resolving deltas: 100% (95/95), done.
(py3) [root@test opt]# cd jumpserver/
(py3) [root@test jumpserver]# git checkout master
Already on 'master'
安装依赖 RPM 包
(py3) [root@test jumpserver]# cd /opt/jumpserver/requirements/
(py3) [root@test requirements]# yum -y install $(cat rpm_requirements.txt)
#无任何报错即可完成
安装 Python 库依赖
(py3) [root@test requirements]# pip install -r requirements.txt
#这里官方比较坑,说不要指定源,不指定源根本装不了,可根据实际情况指定相关的新pip源进行安装,实在安装不了的,下载源码包手工安装。
安装 Redis
Jumpserver 使用 Redis 做 cache 和 celery broke
(py3) [root@master opt]# yum -y install redis
(py3) [root@master opt]# service redis start
Redirecting to /bin/systemctl start redis.service
(py3) [root@master opt]# lsof -i :6379
COMMAND     PID  USER   FD   TYPE DEVICE SIZE/OFF NODE NAME
redis-ser 22530 redis    4u  IPv4  71615      0t0  TCP localhost:6379 (LISTEN)
安装 MySQL
这里直接使用二进制安装包安装,具体可参考之前的文章...
浏览更多内容请先登录。
立即注册
分享的网址网站均收集自搜索引擎以及互联网,非查问网运营,查问网并没有提供其服务,请勿利用其做侵权以及违规行为。
更新于:2022-05-25 21:54:44
相关内容
Opencart 免费主题下载汇总
Opencart 可用的免费主题
python代码整理(2022年4月-2024年3月)
Python和PHP获取百度url跳转的真实地址代码(2022年4月实测有效)
Pip/python-如何查看已安装的包有哪些版本?如何查看某个包存在哪些版本?pip...
用undetected_chromedriver代替selenium解决浏览器打不开网页
sublime text下 Python 问题:TabError: inconsistent use of tabs and s...
视频精选一
IT理论
OSI模型-百度百科
OSI模型-智库百科
OSI model-维基百科
SOCKS-维基百科
socks-百度百科
这里整理一些网上找到的IT项目
All in Web | 远程桌面网关-Apache Guacamole
gitlab 的简介
【教程】使用腾讯云轻量应用服务器搭建 Guacamole 远程桌面代理服务器,让境...
apache 开源项目全家桶 2020年12月中文介绍
JumpServer 架构浅解
手把手从0开始教你搭建Jumpserver,为服务器安全保驾护航!
一步步安装Jumpserver堡垒机图文详解(官方教程版),从此爽歪歪!
[Awesome Github] -2020_07_25
Windows系统Git安装教程(详解Git安装过程)
Aria2:windows上的详细使用方法
开源论坛:社区选择Discourse(在github上论坛排名第一 ,35.8K个星星)
推荐内容