原 WEB技术
|--原 2021年安装Android Studio心得
2018年时安装过Android Studio 3.0,当时还做了一个记录,但是那个记录有些问题,2021年2月再装时遇到了新的问题,本来打算就安装Android Studio 3.0,后面装了各种问题,于是决定安装最新版的,安装最新版本的Android Studio 4.1,又遇到了问题,就是安装Android SDK后,发现很多版本都不能安装,一开始以为都不能安装,因为没有看懂提示未明白不能安装的原因,以为是因为像之前那样是网络访问下载的源有问题。选择安装时,安装按钮install是灰色不能安装的。于是以为SDK都不能安装,后来发现有些可以安装,再之后遇到Could not GET 'https://dl.google.com/dl/android/maven2/com/android/tools/build/gradle/4.1.2/gradle-4.1.2.pom'. Received status code 400 from server: Bad Request。再网上找到下面办法关闭了代理之后,发现基本都可以安装了。(注:2018年我是开了代理,用国内的源安装的,因为当时不开代理无法安装,于是以为现在2021还是这样,结果被坑了至少8小时 20210222)...
|--原 安装Android Studio 3.0
此内容已经过时,安装Android Studio请查看最新的安装Android Studio心得。20210222
依赖关系:Android Studio 依赖 Android SDK,Android SDK 依赖 JDK 。
所以最好先安装JDK,下载地址
http://www.oracle.com/technetwork/java/javase/down...
安装好后再安装Android SDK(windows推荐选择exe安装版的)(注意安装路径不要包含空格),下载地址
http://tools.android-studio.org/index.php/sdk
安装的其实是连带了Android SDK Tools的,然后打开Android SDK Tools里的SDK Manager,下载必要的Packages(包),因为国内大防火墙的原因,要用国内镜来下载这些包。
Android SDK在线更新镜像服务器:
大连东软信息学院镜像服务器地址:
mirrors.neusoft.edu.cn 端口:80
腾讯Bugly镜像...
|--原 使用Android模拟器时遇到的问题
启动模拟器时报的错。[2018-02-11 10:06:17 - Emulator] I/O warning : failed to load external entity "file:/C:/Users/Administrator/.AndroidStudio3.0/config/options/...
启动模拟器时报的错。...
|--摘 Android studio出现Error:failed to find target android-19或android-26等等。
Android Studio中出现Error:failed to find target android-19是因为没有安装Android SDK Platform 19(Android 4.4.2 API 19),去按照提示安装好即可消除此错误。同...
Android Studio中出现Error:failed to find target android-19
是因为没有安装Android SDK Platform 19(Android 4.4.2 API 19),去按照提示安装好即可消除此错误。...
|--转 Android studio出现Error:Unable to tunnel through proxy. Proxy returns "HTTP/1.1 400 Bad Reques的解决办法
最近更新了一下Android Studio,在导入新项目之后出现Error:Unable to tunnel through proxy. Proxy returns “HTTP/1.1 400 Bad Request”的错误,如下图所示:经过检...
最近更新了一下Android Studio,在导入新项目之后出现Error:Unable to tunnel through proxy. Proxy returns “HTTP/1.1 400 Bad Request”的错误,如下图所示:

经过检查后发现这里是丢失了android studio的gradle目录,下面总结一下我的解决方案:
1、设置:settings->Build,Execution,Deploymnet->Gradle
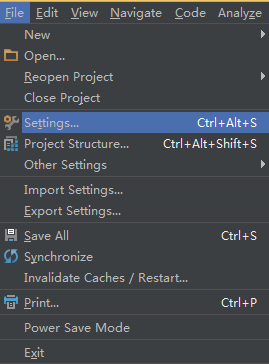
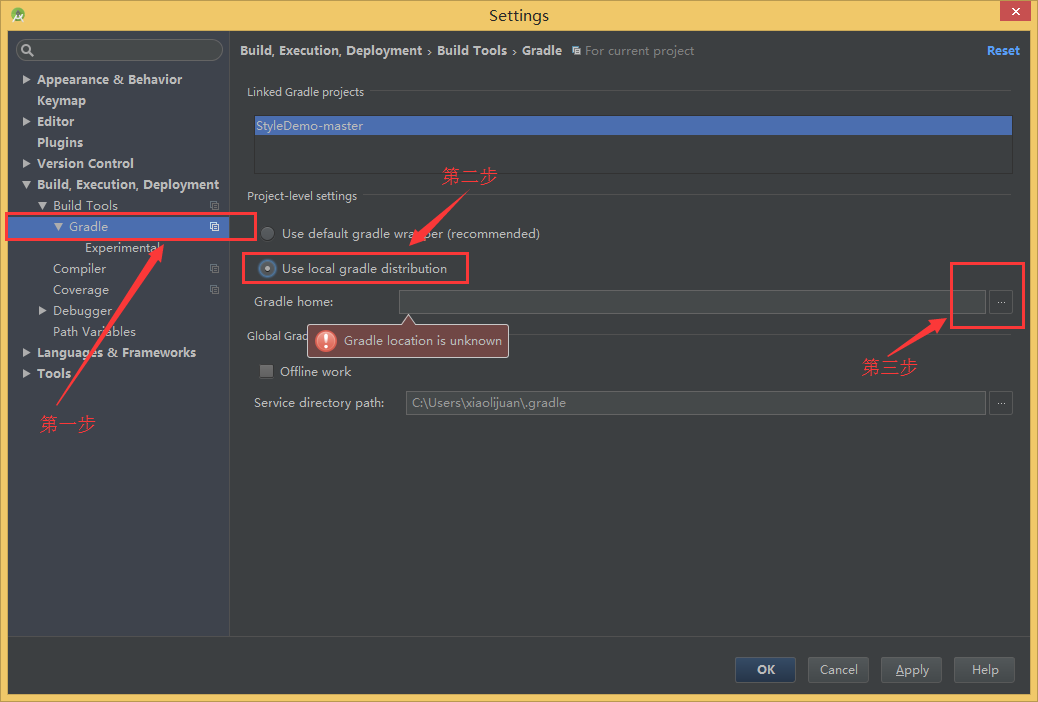 ...
...
|--摘 去掉Android新建项目的顶部标题-application:Theme
原Styles.xml <resources> <!-- Base application theme. --> <style n...
原Styles.xml
<resources>
    <!-- Base application theme. -->
    <style name="AppTheme" parent="Theme.AppCompat.Light.DarkActionBar">
        <!-- Customize your theme here. -->
        <item name="colorPrimary">@color/colorPrimary</item>
        <item name="colorPrimaryDark">@color/colorPrimaryDark</item>
        <item name="colorAccent">@color/colorAccent</item>
    </style>
</resources>
修改后Styles.xml:
<resources>

    <!-- Base application theme. -->
    <style name="AppTheme" parent="Theme.AppCompat.Light.NoActionBar">
        <!-- Customize your theme here. -->
        <item name="colorPrimary">@color/colorPrimary</item>
        <item name="colorPrimaryDark">@color/colorPrimaryDark</item>
        <item name="colorAccent">@color/colorAccent</item>
    </style>

</resources>
关键就是把: parent="Theme.AppCompat.Light.DarkActionBar" 改成 parent="Theme.AppCompat.Light.NoActionBar"。...
|--转 colorAccent,colorPrimary,colorPrimaryDark等含义
伴随Android5.0+之后,除了新增一些ToolBar、recyclerview、cardview等控件,MD的设计,App样式也改变了一些。 http://blog.csdn.net/f917386389/article/details/5...
伴随Android5.0+之后,除了新增一些ToolBar、recyclerview、cardview等控件,MD的设计,App样式也改变了一些。 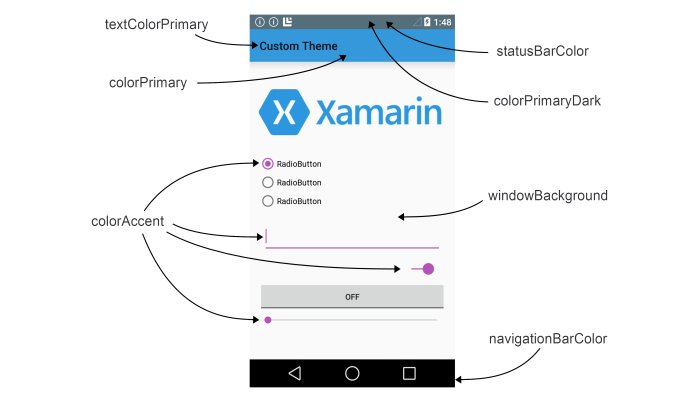 ...
...
|--摘 网站(WebApp程序)打包成手机App的APK文件方法,网站生成app的方法
首先安装Android Studio 3.0,具体方法参见 http://wokan.chawen.org/post/139
先新建一个空白项目。 (2022年6月更新)
首先安装Android Studio 3.0,具体方法参见 http://wokan.chawen.org/post/139
先新建一个空白项目。
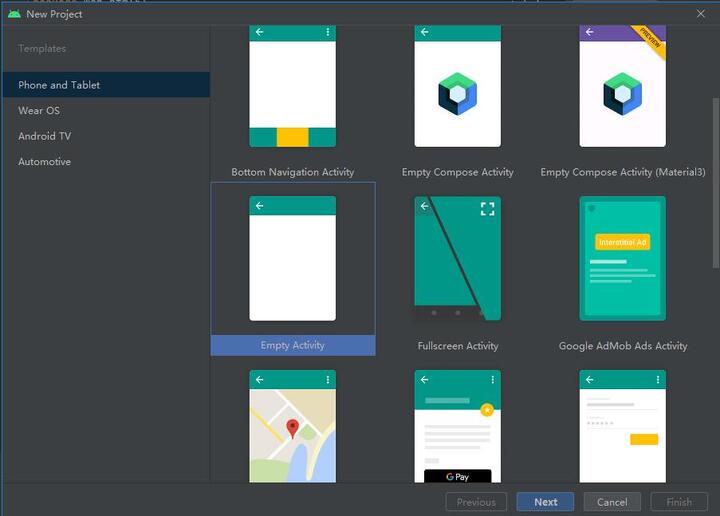
之后要勾选Use legacy android.support libraries ,否则不支持android.support.v7.app.AppCompatActivity
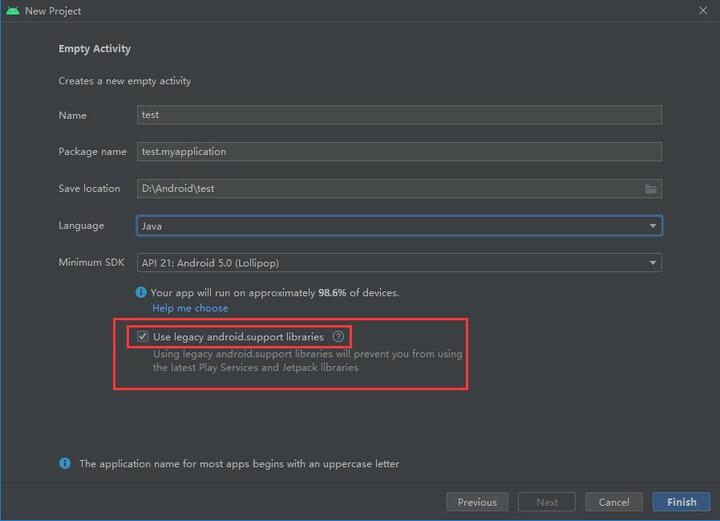
下面是必要的更改:
更改MainActivity.java文件的代码
package org.chawen.wokan;//这里更改成你自己的包名
import android.support.v7.app.AppCompatActivity;
import android.os.Bundle;
import android.view.KeyEvent;
import android.webkit.WebSettings;
import android.webkit.WebView;
import android.webkit.WebViewClient;
public class MainActivity extends AppCompatActivity {
    private WebView webView;
    @Override
    protected void onCreate(Bundle savedInstanceState) {
        super.onCreate(savedInstanceState);
        setContentView(R.layout.activity_main);
        init();
    }
    private void init(){
        webView = findViewById(R.id.webView);
        //启用支持javascript
        WebSettings settings = webView.getSettings();
        settings.setJavaScriptEnabled(true);
        webView.getSettings().setCacheMode(WebSettings.LOAD_CACHE_ELSE_NETWORK);//优先用缓存
        //webView.getSettings().setCacheMode(WebSettings.LOAD_NO_CACHE);//不使用缓存
        //WebView加载web资源
        webView.loadUrl("http://wokan.chawen.org");//这里填写你自己的网址
        //覆盖WebView默认使用第三方或系统默认浏览器打开网页的行为,使网页用WebView打开
        webView.setWebViewClient(new WebViewClient(){
            @Override
            public boolean shouldOverrideUrlLoading(WebView view, String url) {
                // TODO Auto-generated method stub
                //返回值是true的时候控制去WebView打开,为false调用系统浏览器或第三方浏览器
                view.loadUrl(url);
                return true;
            }
        });
    }
    //改写物理按键——返回的逻辑,希望浏览的网页后退而不是退出浏览器
    @Override
    public boolean onKeyDown(int keyCode, KeyEvent event) {
        // TODO Auto-generated method stub
        if(keyCode== KeyEvent.KEYCODE_BACK)
        {
            if(webView.canGoBack())
            {
                webView.goBack();//返回上一页面
                return true;
            }
            else
            {
                System.exit(0);//退出程序
            }
        }
        return super.onKeyDown(keyCode, event);
    }
}
修改AndroidManifest.xml,增加允许用户internet访问和始终竖屏,
<?xml version="1.0" encoding="utf-8"?>
<manifest xmlns:android="http://schemas.android.com/apk/res/android"
    package="org.chawen.wokan">
    <uses-permission android:name="android.permission.INTERNET" />
    <application
        android:allowBackup="true"
        android:icon="@mipmap/ic_launcher"
        android:label="@string/app_name"
        android:roundIcon="@mipmap/ic_launcher_round"
        android:supportsRtl="true"
        android:theme="@style/AppTheme">
        <activity android:name=".MainActivity" android:screenOrientation="portrait">
            <intent-filter>
                <action android:name="android.intent.action.MAIN" />
                <category android:name="android.intent.category.LAUNCHER" />
            </intent-filter>
        </activity>
    </application>
</manifest>
更改layout/activity_main.xml代码,tools:context="org.chawen.wokan.MainActivity","org.chawen.wokan"更改成自己的包名。
<?xml version="1.0" encoding="utf-8"?>
<RelativeLayout xmlns:android="http://schemas.android.com/apk/res/android"
    xmlns:tools="http://schemas.android.com/tools"
    android:id="@+id/activity_main"
    android:layout_width="match_parent"
    android:layout_height="match_parent"
    android:paddingBottom="0dp"
    android:paddingLeft="0dp"
    android:paddingRight="0dp"
    android:paddingTop="0dp"
    tools:context="org.chawen.wokan.MainActivity">

    <WebView
        android:layout_width="match_parent"
        android:layout_height="match_parent"
        android:id="@+id/webView"
        />
</RelativeLayout>
找到文件“build.gradle(Module:app)”,修改applicationId即应用ID,可以根据自己的网站或公司命名。同时修改versionName 版本号。 ...
|--原 安装Android Studio3 ,新建项目后有提示ERROR: Could not install Gradle distribution from
ERROR: Could not install Gradle distribution from
https://services.gradle.org/distributions/gradle-5.4.1-all.zip
错误原因:是由于首次安装,AndroidStudio需要初始化,或导入了其它项目后,需要下载gradle压缩包,但在下载的过程中,遇到了网络阻塞,导致下载超时而报错。
解决方案:直接手动下载gradle-5.4.1-all.zip
...
|--转 Android Studio 遇到an existing android sdk was detected 报错
Inside of Android SDK Manager you need to update the following tools
- Android SDK Tools
- Android SDK Platform-tools
You also might want to install API 25, API 24 and API 23 SDK platforms. Also if you plan to use the Google Emulator install some relevant x86/x86_64 System images....
|--转 Gradle build 报错 Could not GET ....:Received status code 400 from server: Bad Request
Could not GET 'https://dl.google.com/dl/android/maven2/com/android/tools/build/gradle/3.1.2/gradle-3.1.2.pom'. Received status code 400 from server: Bad Request。
全部错误是这样的:
Could not GET 'https://dl.google.com/dl/android/maven2/com/android/tools/build/gradle/3.1.2/gradle-3.1.2.pom'. Received status code 400 from server: Bad Request。
遇到这个错了以后,我先后做了以下尝试:
- 手动下载确认链接无误。
- 查询400 code,意思大概是客户端请求语法问题或者参数有问题。这样就很有可能是代理出问题了。
- 关闭了VPN,关闭Android Studio的代理,全部无效。
- ping dl.google.com 没问题。
- 重装Android Studio,删除所有配置文件,无效。
- 建立新的空的工程无效。
- 确认执行build命令的主体是gradle。那么可能是gradle配置了错误的代理?那么gradle的代理在哪里配置呢??
最后这一步拯救了浪费了一整个下午排错的我。所以最后我遇到的问题是:...
|--转 net::ERR_CLEARTEXT_NOT_PERMITTED Android9.0无法加载url
https://blog.csdn.net/qq_33721320/article/details/84400825
今天无意间用了小米9,测试了WebView打开的一些链接,在其他的手机上(系统8.0以下)都是正常可以打开链接。
然后定位到问题所在,记录一下net::ERR_CLEARTEXT_NOT_PERMITTED的原因,如下:
从Android 9.0(API级别28)开始,默认情况下禁用明文支持。因此http的url均无法在webview中加载
附上我使用的解决办法:
在manifest 中application节点添加
android:usesCleartextTraffic="true"
- 1
添加后如下:
<?xml version="1.0" encoding="utf-8"?>
<manifest ...>
    <uses-permission android:name="android.permission.INTERNET" />
    <application
        ...
        android:usesCleartextTraffic="true"
        ...>
        ...
    </application>
</manifest>
- 1
- 2
- 3
- 4
- 5
- 6
- 7
- 8
- 9
- 10
附上链接:https://stackoverflow.com/questions/45940861/android-8-cleartext-http-traffic-not-permitted...
|--原 android studio 模拟器的安装及运行app程序(invalid resource directory name)
invalid resource directory name
Session 'app': Installation did not succeed.The application could not be installed: INSTALL FAILED I
invalid resource directory name
android的res目录是固定的,只能是下面的几种,如果加了其他的目录,它会报‘invalid resource directory name'的错误,其实加了其它系统不认的目录...
|--转 2022年4月安装 Android Studio
依赖关系:Android Studio 依赖 Android SDK,Android SDK 依赖 JDK 。
所以最好先安装JDK,下载地址
http://www.oracle.com/technetwork/java/javase/down...
安装好后再安装Android SDK(windows推荐选择exe安装版的)(注意安装路径不要包含空格),下载地址
http://tools.android-studio.org/index.php/sdk
安装好了JDK和Android SDK,再安装Android Studio(去官网下载或者在百度上找),
如果没有安装Android SDK
运行时会提示:Unable to access Android SDK add-on list
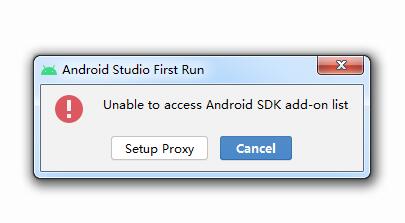
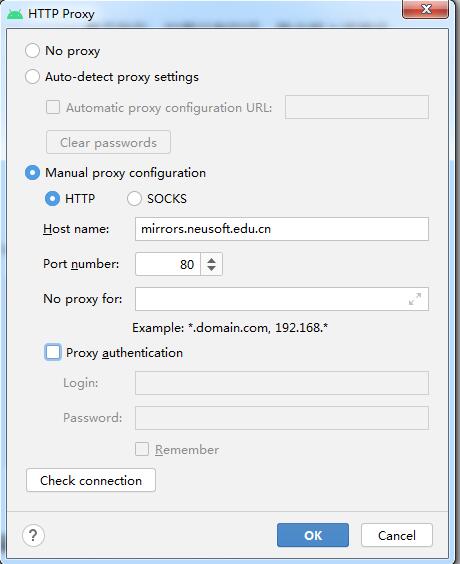
于是配置Proxy,
mirrors.neusoft.edu.cn 端口:80
之后继续安装提示:SDK emulator directory is missing
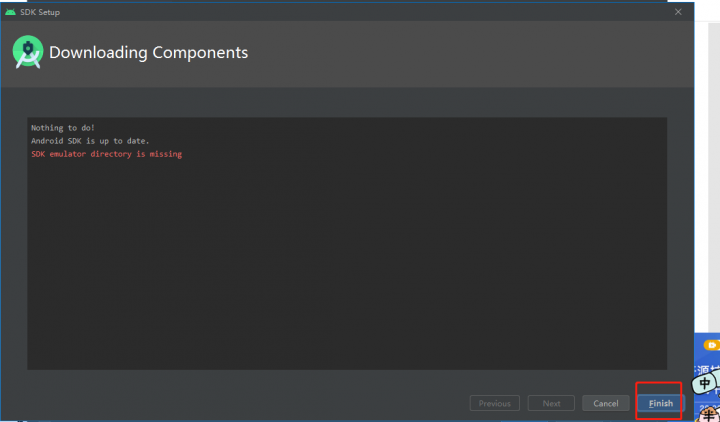
安装的其实是连带了Android SDK Tools的,然后打开Android SDK Tools里的SDK Manager,下载必要的Packages(包),因为国内大防火墙的原因,要用国内镜来下载这些包。
Android SDK在线更新镜像服务器:
大连东软信息学院镜像服务器地址:
mirrors.neusoft.edu.cn 端口:80
腾讯Bugly镜像
android-mirror.bugly.qq.com 8080
中国科学院开源协会镜像站地址:
IPV4/IPV6: mirrors.opencas.cn 端口:80
IPV4/IPV6: mirrors.opencas.org 端口:80
IPV4/IPV6: mirrors.opencas.ac.cn 端口:80
上海GDG镜像服务器地址:
sdk.gdgshanghai.com 端口:8000
北京化工大学镜像服务器地址:
IPv4: ubuntu.buct.edu.cn/ 端口:80
IPv4: ubuntu.buct.cn/ 端口:80
IPv6: ubuntu.buct6.edu.cn/ 端口:80
使用 Android SDK Manager下载sdk时 ,打开主界面,选择「Tools」、「Options」,弹出『Android SDK Manager - Settings』窗口: ...
|--转 Android隐藏标题栏、状态栏、导航栏及全屏方法总结
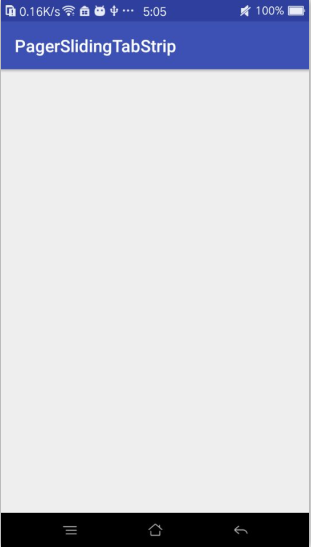
Android开发中,有时候根据需求要隐藏标题栏、状态栏、导航栏或者全屏显示。看似很简单的功能,但是不注意使用环境,就会出现错误。
java.lang.IllegalStateException: You need to use a Theme.AppCompat theme (or descendant) with this activity.
在AndroidManifest.xml中使用 android:theme="@android:style/Theme.Light.NoTitleBar"或android:theme="@android:style/Theme.Light.NoTitleBar.Fullscreen"来隐藏标题栏和状态栏的错误。
下面我们就来详细的分析下不同情景下,隐藏标题栏、状态栏、导航栏及全屏实现方法:
1. 隐藏标题栏
① 在代码里实现
- Activity继承 Activity:
this.requestWindowFeature(Window.FEATURE_NO_TITLE);//去掉标题栏
注意:一定要写在setContentView()方法之前
- Activity继承 AppCompatActivity:
getSupportActionBar().hide();// 隐藏ActionBar
② 在清单文件(AndroidManifest.xml中的application或者activity)里面实现
- Activity继承 Activity:
<application
    android:allowBackup="true"
    android:icon="@mipmap/ic_launcher"
    android:label="@string/app_name"
    android:supportsRtl="true"
    android:theme="@android:style/Theme.Light.NoTitleBar">
<!--android:theme="@style/Theme.AppCompat.Light.NoActionBar"/>-->
    ...
</application>
或
<activity android:name=".MainActivity"
    android:theme="@android:style/Theme.Light.NoTitleBar"/>
 <!--android:theme="@style/Theme.AppCompat.Light.NoActionBar"/>-->
- Activity继承 AppCompatActivity:
<application
    android:allowBackup="true"
    android:icon="@mipmap/ic_launcher"
    android:label="@string/app_name"
    android:supportsRtl="true"
    android:theme="@style/Theme.AppCompat.Light.NoActionBar">
    ...
</application>
或
<activity android:name=".MainActivity"
    android:theme="@style/Theme.AppCompat.Light.NoActionBar"/>
③ 在style.xml文件里定义,在AndroidManifest.xml中的application或者activity上引用
- Activity继承 Activity/AppCompatActivity:
style.xml文件:
<?xml version="1.0" encoding="UTF-8" ?>
<resources>
    <style name="notitle" parent="Theme.AppCompat.Light.NoActionBar">
        <item name="android:windowNoTitle">true</item>
    </style>
</resources>
AndroidManifest.xml文件:
<application
    android:allowBackup="true"
    android:icon="@mipmap/ic_launcher"
    android:label="@string/app_name"
    android:supportsRtl="true"
    android:theme="@style/notitle">
    ...
</application>
或
<activity android:name=".MainActivity"
    android:theme="@style/notitle"/>
注意:
1)android:theme="@android:style/Theme.Light.NoTitleBar"代码如果在application中配置的话,整个APP的 Activity都只能是继承自Activity,不能是AppCompatActivity,因为AppCompatActivity下的 Theme只能是ActionBar样式的;如果只在某一个 Activity下配置,那么只要确保当前 Activity是继承Activity,而不是继承AppCompatActivity即可;
2)android:theme="@style/Theme.AppCompat.Light.NoActionBar"代码如果在application中配置的话,整个APP的Activity可以继承Activity或者AppCompatActivity;如果只在某一个 Activity下配置,当前 Activity可以继承Activity或者AppCompatActivity。
2. 隐藏状态栏

① 在代码里实现
- Activity继承 Activity/AppCompatActivity:
getWindow().setFlags(WindowManager.LayoutParams.FLAG_FULLSCREEN, WindowManager.LayoutParams.FLAG_FULLSCREEN);
...
|--转 如何使用Android Studio将网站转换为Android App
In this tutorial you will learn how to convert website to android app using Android Studio.
在本教程中,您将学习如何使用Android Studio将网站转换为android应用。
Before reading this tutorial I hope that you already have basic knowledge of Android App Development. Otherwise you won’t be able to understand anything.
在阅读本教程之前,我希望您已经具有Android App Development的基本知识。 否则,您将无法理解任何内容。
What I will do here is simply open the website in webview with a loading bar so that it will look like we are using an android app.
我在这里要做的就是简单地在Webview中使用加载栏打开网站,以便看起来我们正在使用android应用。
By using this method you can convert website or wordpress blog into android application. You can follow this link to see an example app that I have created using this process.
通过使用此方法,您可以将网站或wordpress博客转换为android应用程序。 您可以点击此链接查看我使用此过程创建的示例应用程序。
Note: Make sure the website for which you want to create app is responsive, otherwise the app will not look proper.
注意:请确保您要为其创建应用程序的网站具有响应能力,否则该应用程序将无法正常显示。
If you want to integrate admob and google analytics in your app then you can follow below tutorials.
如果您想将admob和Google Analytics(分析)集成到您的应用中,则可以按照以下教程进行操作。
Also Read: Android Google Analytics Integration Tutorial
另请参阅: Android Google Analytics(分析)集成教程
Also Read: Android AdMob Tutorial
另请参阅: Android AdMob教程
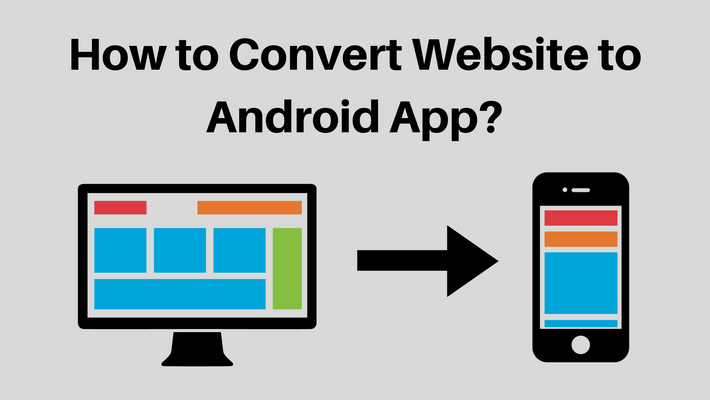
如何将网站转换为Android App (How to Convert Website to Android App)
Create an android studio project with the website name.
使用网站名称创建一个android studio项目。
Add internet access permission to AndroidManifest.xml file.
将互联网访问权限添加到AndroidManifest.xml文件。
<uses-permission android:name="android.permission.INTERNET"/>
Add following code in activity_main.xml file. Here I have added a horizontal progress bar with a webview.
在activity_main.xml文件中添加以下代码。 在这里,我添加了带有Webview的水平进度条。
activity_main.xml
activity_main.xml
<RelativeLayout xmlns:android="http://schemas.android.com/apk/res/android"
    xmlns:tools="http://schemas.android.com/tools"
    android:layout_width="match_parent"
    android:layout_height="match_parent"
    tools:context="com.myudaipurcity.MainActivity">
    <ProgressBar
        android:id="@+id/progressBar"

        android:layout_width="fill_parent"
        android:layout_height="5dp"
        android:progressDrawable="@drawable/bg_progress_bar_webview" />

    <WebView
        android:id="@+id/webView"
        android:layout_width="match_parent"
        android:layout_height="match_parent"
        android:layout_below="@+id/progressBar"
        />
</RelativeLayout>
Create an xml file inside drawable folder and add following code in it. It is a custom background for progress bar. You can change the color by changing color code in res/values/color.xml file....